At Home With The Hinsons

Wednesday, April 28, 2010

Crafty Creation "C" for Carson

Hi friends!
How are ya'll doing?
It's only Wednesday,
but it's already been a busy week here.
But, I'm never too busy 
for a crafty creation.
Right?!

This crafty creation is for my cousin's son, Carson.
He just celebrated his first birthday this past weekend.
Since I was at home sick all weekend,
we missed the festivities. :( 
When James found out we missed the party he said
"Well YOU might have been sick, but I wasn't!!!"
Needless to say Carson might forgive me
for being sick, but James won't.
Oh how that child loves a good party! 

Now on to the fun...
the gift.
I started with a "C" from Hob Lob.
I painted, modge podged, sanded, decorated,
antiqued and then modge podged some more.
Until this...
became this.

I just couldn't help myself 
and had to make a matching card.
Once everything was good and dry,
I used my Crop-a-dile to attach twine as a hanger.
Finally, a cute gift demands cute giftwrap. :)
Since I'm practical and crafty
his gift included a cute pair of camo shorts too.
So do tell,
do you wish your name was Carson
and this was your gift?!

Don't forget to stop by the CSI Project
for the ultimate in Modge-Podge Inspiration.
Visit thecsiproject.com

Monday, April 26, 2010

James' Fun Filled Field Trip

Hi all,
Happy Monday!
Are your bathrooms cleaned yet?
If not go right now and clean them.
I promise it'll make the rest
of your week so much sweeter. ;>

So I'm gladly back among the living and functioning.
The gross allergy/sinus stuff I had this weekend
is exactly why Mamas can't be sick...
we don't have time!

Speaking of time,
it's probably time I share last week's field trip with you.
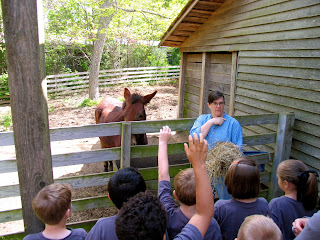
James' 1st grade class visited
Burritt on the Mountain in Huntsville, AL.

It was a breezy overcast day,
but when the sun shone it was warm
making it the perfect field trip weather!
Here's the class in front of one of the homes.
They call this a Dog Trot home...
because a dog can trot right through the middle. 
This is inside one of the homes.
The lady was showing us their bathtubs.
All the kids were excited when they found 
out that people use to just bathe once a week!

Here the kids were learning about how clothes were made.
If a child outgrew his coat, 
for a new one to be ready in the Fall
his mom would start working on it in the Spring.
Oh mercy I've got it good!
To make the clothing they started by sheering the sheep.
Then they combed it into a little wad.
Which I can't remember the technical name for.
That's when they spun it into yarn.
If you were "well to do" then you had your own loom.
If not?
You had to wait until the weaver came by
to weave your yarn into cloth.
Here's James checking out the weaver's loom.

Once we the kids learned about clothing,
we moved on to farm animals.
They actually preferred to have mules,
which comes from a male donkey and a female horse.
Mule's can be trained to pull more weight than donkeys.
Oh the things we learned. :)
Now you can't have a farm without a cow.
And this cow?
Well, she was sticking her tongue out at me!
Simmer down Bessie,
I like your milk just fine.
I only get upset when it's made into
formula and fed to human babies. :)
The kids were astonished to learn that 
there was no such thing as computers 
or telephones in the 1800's.
What if you needed to tell someone something?
Well then you hand wrote a letter to that person,
and mailed it...
which took about a week to get there.
The kids were amazed!
Lastly the lady asked us if we knew
what a jar like this might contain.
The answer she was looking for
was something poisonous.
The answer she got from a kid in our group?
Voo-doo!
Honestly, what are that kid's parents teaching him?!
I think it's safe to say that poor lady
will never ask that question again!

We ended our trip with a picnic lunch.
And this kid,
well he talked me into checking him out
and taking him home with me.
Look at this face,
there's no way I could resist!
Thanks for reliving our fun filled field trip.
I learn so much on field trips as an adult chaperone! ;>

Sunday, April 25, 2010

Lazy Weekend

Hi all!
I hope this finds you recovered
from yesterday's storms.
We were blessed to not lose power
or suffer any damage.
I'm actually quite thankful for the rain
and hopeful that it'll put an end to the pollen.
I usually don't have problems with allergies
but his year I've been miserable.
So this was the song I've been singing...
"Down came the rain and washed away the pollen!"

Between the weather and being sick,
I was happy to stay inside
and in my jammy tales all day long.

Thankfully today I'm beginning to
feel among the living again.
And the kids,
well they're just glad to see the sun again!
They enjoyed an afternoon outside
playing water guns, shooting birds
and making snow cones.
Thanks for stopping by!

Tuesday, April 20, 2010

Happy Birthday Baby Sis!

Happy Birthday To You,
Happy Birthday Baby Sister,
Happy Birthday To You!
You might be getting older, but remember...
No matter how old you are,
I'll always try to be the boss of you.
But it's just because your the one who 
taught me how to be a mother hen. 
I'm so proud of the God centered woman you've become.
God's blessings on another fabulous year sis! 

Sunday, April 18, 2010

Our Spring Break Patio Makeover!

Hi all,
I hope you've enjoyed this weather as much as we have.
This has been one of the prettiest Spring Breaks.
I'm so glad the guys chose to revamp the patio.
It was the perfect excuse to ditch housework
and spend the week playing outside! 

So now that phase 1 is complete,
I'm ready to share our patio makeover with you.
We'll start out with a before picture.
Here we have a nice but dirty patio, 
with random furniture scattered about.
What followed was 5 days of...
Hosing down,


Rearranging,

Cleaning up and hauling off,

Father & Son teamwork,

and several crafty creations.

So that when we week was over
we could enjoy our hard work
and relax, at home. 

Now, here's the after.
They were joined by the bench 
that hides all our outside toys.
Yes friends, that'd be the same bench
that has sat in pieces for two years,
because nobody could figure out how to put it together.
Although it made great shields for airsoft wars,
I much prefer it's current use. :)


The basketball goal has been relocated
and so far the kids are loving it there better.

Here are a few close up photos.
The largest Santa star got a special paint treatment.
But in all honesty I'm not sure that I love it, we'll see.
I used our same table and rocking chairs
and just added a few accessories.

Here's the bench again.
I topped it with two of the outside pillows
from last year, and added in a few new ones.
For this years pillows I used the same type
outside place mats from Tuesday Mornings
($9.99 for a set of 4).
Except this time when I split them apart
I monogrammed the front panel
before stuffing it and stitching it back up.
Four monogrammed outside pillows for $9.99,
everyone together, SqEaL!!!
In case you're wondering why I chose 1403,
it's actually our house number.

And here is my Mama hangout.
This is my two year old, $20 lounge chair.
I topped it off with a hand me down cushion from my Mom.
Thanks Mom! 
This little spot is quite cozy.
It's been perfect for kicking back,
soaking up some sun
and watching the kids play. :)

Speaking of kids,
I couldn't start off the season without 
a new water sprinkler.
Pepper loves how this one sprays a million different streams.

Last but not least,
we finally hung our IKEA swing and rings.
I gave up on having the perfect place to put them
and tied them around a couple of tree limbs.

I'm so glad I got over wanting everything perfect.
Because this swing has brought more moments 
of joy and laughter than I ever expected.

In the process of our week,
Andy's also gotten his little garden ready for planting.
We're super excited to have a garden again this year!

As our week and project list came to a close
I've already started thinking about phase 2.
I'll no doubt find more things to spray paint.
I also plan on adding flowers.
I'm sure some will go in the flower beds,
but how great would our patio look with a few window boxes?


Now you wanna see what I've really got my heart set on?
A hammock swing!
I forgot how relaxing it is to be outdoors
and do nothing.
So, just as soon as the budget for phase 2 
has been approved (wink, wink)
I'll get started again. 

But until then,
you find us finally enjoying our patio the way it's meant to be.
Grilling hot dogs with family
and enjoying water gun fights with friends.
I'd say our Spring Break Patio Project
turned out to be a delightful design on a dime!

Thanks for visiting.
I'd love to hear your thoughts on our revamped space!
Don't forget to stop by
The DIY Project Parade,
and Somewhat Simple
for more inspiration.


Tuesday, April 13, 2010

A Fabulously Fresh Retro Garbage Can

Hi all,
and welcome to my weirdest,
most fabulous crafty creation yet!
The patio project is moving along nicely.
We've cleaned, rearranged and decorated.
The only thing missing?
A fancy-smancy garbage can...
that is until now.

It all started as I was digging around
for new found treasures behind our shed.
I was rummaging around when I came across this.
Can we agree that it's quite possibly
the most retro garbage can evah??
Yes, I was sure you'd agree.

The cool part was that it was metal
and although u-g-l-y, it still had life left.
So I set about giving it a beautiful makeover.

I started by spray painting the lid.
Pink,

that's right a pink garbage can lid.
Because really, if we're going
it might as well be all out!

Next I started painting the can.
The official color name is Watermelon.
I knew I was going to attempt stripes
and I wanted the top to match the lid.

Side note: If you're trying a new technique
it might as well be on something that was already garbage.
That way when if you mess up,
there's no harm, no fowl.


I progressed on to my second color.
I call it Pistachio green,
but Krylon calls it Ivy Leaf.

Finally, I taped off again and started my last color.
For the bottom I chose Navy.
I wanted a dark color and
I already had 2 cans on hand,
SWEET!

After multiple coats of the Navy
I had the coverage I was looking for.
Once I couldn't stand it any longer
patiently allowed my paint to dry,
it was time to take off the tape.
I removed it slowly and at an angle.
For the most part my lines were crisp and clean.
Not bad for a first timer! ;>
Although I was loving the stripes,
I knew it still needed a little something.
Hum,
think, think, think...
and then,
Cricut to the rescue!

I whipped up my saying in white vinyl.
I used my painter's tape to line up my words.
Toss
It
Here
(cause yo Mama is really tired of picking up after yo tired tails)
Of course I added a small flower to dot the I
and another flower on the handle.
Because I just couldn't help myself. :)
Finally I topped it all off with
a clear glossy top coat.
TaDa!

You like?
Me LOVE!!!
All it took was a couple cans of spray paint,
painter's tape,
vinyl wording,
a bit of imagination
and a little hard work.
HOORAY for crafty creations!
Thanks for stopping by
and don't forget to visit,
The DIY Project Parade,
Somewhat Simple,
Tales From Bloggeritaville ,
Today's Creative Blog,
Blue Cricket Designs
Someday Crafts,
and last but not least
Visit thecsiproject.com
for more inspiration. :D